Send your first message
ChatUI SDK is built on Nexconn Chat (@nexconn/chat) and Nexconn Engine (@nexconn/engine). It provides Web UI for channels and messages so you can assemble a chat experience quickly.
This guide covers package-manager integration and how to show the UI.
Browser support
| Chrome | Safari | Edge | WeChat in-app browser |
|---|---|---|---|
| 68+ | 13+ | 100+ | Not supported |
Only Chrome, Safari, and Edge are supported. Portrait mobile browsers are not a supported target for the UI today.
Prerequisites
- Create a developer account. After sign-up, the console creates an app and an App Key for the development environment (see the console for details).
- On App Key management, copy the App Key and App Secret. Before launch, switch to production keys and validate end-to-end.
Development and production data are isolated. Run final checks with production App Keys before you go live.
Demo scope
- ChatUI is not tuned for portrait H5 mobile layouts.
- Direct, group, and system channels are supported.
- Nexconn Web SDKs are installed only via npm, pnpm, or yarn. There is no official CDN
<script>distribution.
Install dependencies
@nexconn/chatui depends on Nexconn Chat and Nexconn Engine. Because your app usually imports @nexconn/chat APIs directly during initialization, install the three packages at matching versions.
Versions
Use these released package versions for the examples in this guide:
| Package | Example version |
|---|---|
@nexconn/engine | 26.2.1 |
@nexconn/chat | 26.2.1 |
@nexconn/chatui | 26.2.1 |
If your own app code imports Lit directly, install a compatible lit version as an application dependency. ChatUI already declares lit in its package dependencies.
npm
npm install @nexconn/engine@26.2.1 @nexconn/chat@26.2.1 @nexconn/chatui@26.2.1 --save
pnpm
pnpm add @nexconn/engine@26.2.1 @nexconn/chat@26.2.1 @nexconn/chatui@26.2.1
Vue projects
ChatUI renders Web Components. In Vue, mark Nexconn tags as native custom elements so Vue does not treat them as Vue components. SDK tags use the nc- prefix.
Vite
// vite.config.js
import vue from '@vitejs/plugin-vue';

export default {
  plugins: [
    vue({
      template: {
        compilerOptions: {
          isCustomElement: (tag) => tag.startsWith('nc-'),
        },
      },
    }),
  ],
};
vue-cli
// vue.config.js
module.exports = {
  chainWebpack: (config) => {
    config.module
      .rule('vue')
      .use('vue-loader')
      .tap((options) => ({
        ...options,
        compilerOptions: {
          isCustomElement: (tag) => tag.startsWith('nc-'),
        },
      }));
  },
};
Webpack
// webpack.config.js
module.exports = {
  module: {
    rules: [
      {
        test: /\.vue$/,
        loader: 'vue-loader',
        options: {
          compilerOptions: {
            isCustomElement: (tag) => tag.startsWith('nc-'),
          },
        },
      },
    ],
  },
};
Initialize
Order matters: initialize Nexconn Chat (NCEngine) first, then initialize ChatUI (NCChatUIApplication).
1. Initialize Nexconn Chat
Pass the App Key from the console to NCEngine.initialize. Optionally set areaCode, logLevel, and other options documented in @nexconn/chat.
import { NCEngine, AreaCode, LogLevel } from '@nexconn/chat';

NCEngine.initialize({
  appKey: '<YOUR-APP-KEY>',
  logLevel: LogLevel.WARN,
  // If your App Key is not in the default data center, set areaCode, e.g. AreaCode.SG, AreaCode.NA
  // areaCode: AreaCode.SG,
});
2. Implement ServiceHooks and create the ChatUI app
Provide user, group, system channel, and member data through ServiceHooks. Minimal example (replace with real data):
import type { ServiceHooks } from '@nexconn/chatui';
import { NCChatUIApplication } from '@nexconn/chatui';

const hooks: ServiceHooks = {
  async reqUserProfiles(userIds: string[]) {
    return userIds.map((userId) => ({
      userId,
      name: `User ${userId}`,
    }));
  },
  async reqGroupProfiles(groupIds: string[]) {
    return groupIds.map((groupId) => ({
      groupId,
      name: `Group ${groupId}`,
      memberCount: 0,
    }));
  },
  async reqGroupMembers(groupId: string) {
    return [
      { userId: 'user-01', nickname: 'Member 01' },
      { userId: 'user-02' },
    ];
  },
  async reqSystemProfiles(systemIds: string[]) {
    return systemIds.map((systemId) => ({
      systemId,
      name: `System ${systemId}`,
    }));
  },
};

const app = NCChatUIApplication.initialize({
  hooks,
  language: 'en_US',
});

if (!app) {
  throw new Error('ChatUI initialize failed');
}
| Field | Type | Required | Description |
|---|---|---|---|
| hooks | ServiceHooks | Yes | Fetches user, group, system channel, and member metadata |
| logLevel | LogLevel | No | Log level from @nexconn/chat |
| language | string | No | Initial UI language. Built-in packs are en_US and zh_CN; if omitted, ChatUI resolves from runtime state and falls back to en_US. |
| allowedToRecallTime | number | No | Seconds a sent message can be recalled (default 120) |
| allowedToReEditTime | number | No | Seconds a recalled message can be re-edited (default 60) |
| modalContainerId | string | No | DOM id used for built-in modals; if omitted or missing, ChatUI appends them to document.body |
3. Finish configuration and call ready
Apply menu, language pack, and command switches before ready(). After ready(), ChatUI registers its custom elements and the UI can mount.
app.ready();
After ready(), methods such as openChannel, sendMessage, and the profile update helpers are available. Pre-ready customization that you did not apply earlier will no longer take effect.
Lifecycle helpers
Use ifReady() to guard post-ready APIs such as openChannel, sendMessage, insertMessage, and the profile update helpers.
import { DirectChannelIdentifier } from '@nexconn/chat';

if (app.ifReady()) {
  await app.openChannel(new DirectChannelIdentifier('peerUserId'));
}
To read the current connected user id from ChatUI, call getCurrenUserId():
const currentUserId = app.getCurrenUserId();
The current public method name is spelled getCurrenUserId in 26.2.1.
When your page or route unmounts the ChatUI integration, clean up with destroy():
app.destroy();
Obtain a user token
Tokens map to userId and authenticate the client to Nexconn. The client does not mint tokens; your app server must exchange with Nexconn and the client must fetch a token from your server.
For local testing, use the console’s developer tools or API playground to obtain a test token (exact entry points depend on the console).
Important
In production, always issue tokens from your app server. Never hard-code tokens or the App Secret in the client.
Connect
ChatUI renders the UI; Nexconn Chat owns the connection lifecycle. Register a connection status handler, then call connect.
import {
  NCEngine,
  ConnectionStatusHandler,
} from '@nexconn/chat';

NCEngine.addConnectionStatusHandler(
  'quickstart',
  new ConnectionStatusHandler({
    onConnectionStatusChanged({ status, code }) {
      console.log('Connection status', status, 'code:', code);
    },
  }),
);

const result = await NCEngine.connect({ token: '<TOKEN>' });
if (result.isOk) {
  console.log('Connected, user id:', result.data.userId);
} else {
  console.log('Connect failed', result.code);
}
For reconnect and multi-endpoint behavior, see the Nexconn Chat / Engine documentation.
Show the UI
After ready(), mount the root element nc-chat-ui-app-provider:
const root = document.createElement('nc-chat-ui-app-provider');
root.style.width = '100%';
root.style.height = '100%';
document.body.appendChild(root);
Open a channel (direct example):
import { DirectChannelIdentifier } from '@nexconn/chat';

await app.openChannel(new DirectChannelIdentifier('peerUserId'), true);
Send and receive test traffic
In a test setup, direct chat only requires the peer userId. Friend relationships and policy live in your backend.
- Use Chat Server API tools in the console (or equivalent) to send a text message to the logged-in user to simulate a direct channel.
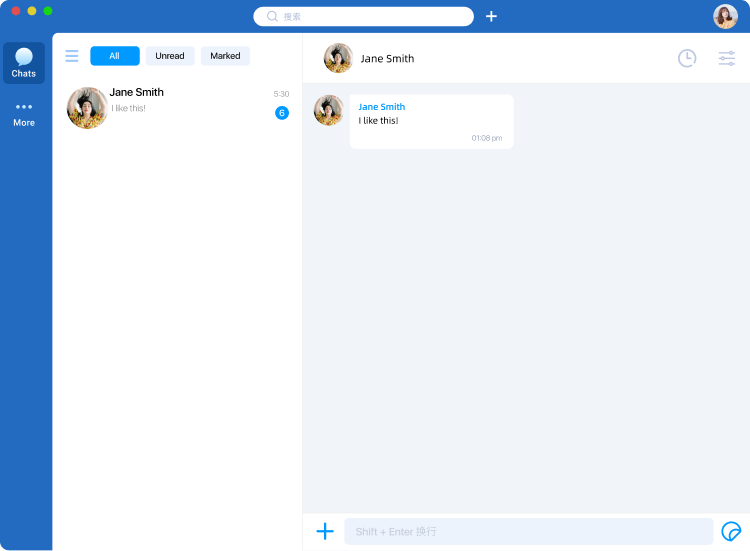
- When the client receives the message, the channel list shows the direct channel; open it to send and receive.
The screenshot is a reference design, not the full default ChatUI layout. Search, filters, header extensions, and outer chrome are your responsibility.
Next steps
You now have a minimal ChatUI integration. Continue with Hooks, events, menus, and custom messages in the following sections.