Send your first message
This quickstart walks you through the core Nexconn SDK flow: import the SDK, initialize it, register handlers, connect to the server, and send a message.
Requirements
| SDK version | Android | API level |
|---|---|---|
| 1.0+ | 5.0 or later | 21+ |
Prerequisites
-
Register a developer account on the Nexconn Console. A default application is automatically created in the development environment upon registration.
-
On the Key Management page, obtain the App Key for your development environment. You can also view the App Secret and data center assignment (Singapore by default).
-
Optionally, create a new application and obtain the App Key and App Secret for the desired environment.
Each application has two separate App Keys for the development and production environments. Data is isolated between environments. Before going live, switch to the production App Key to complete end-to-end testing.
Step 1: Import the SDK
This quickstart uses a Gradle remote dependency. For all import options, see Import the SDK.
-
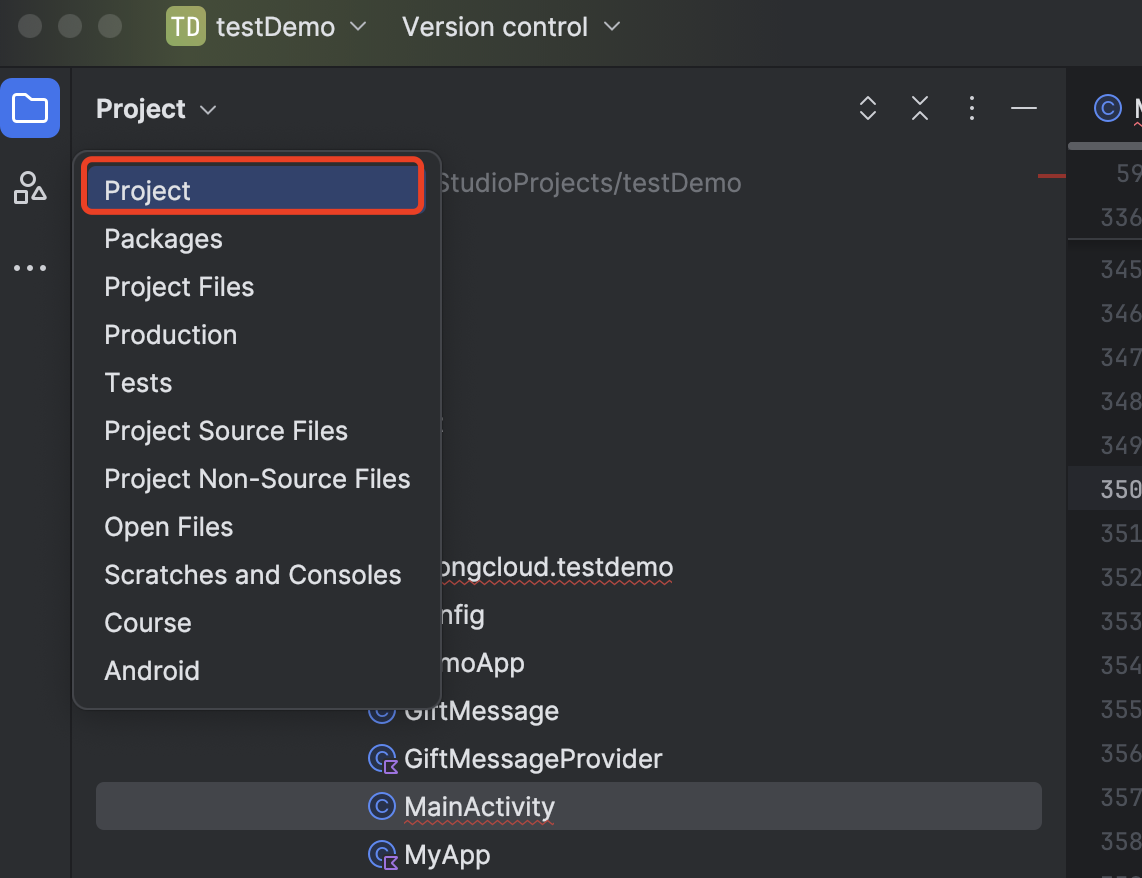
Open your project in Android Studio and switch to the Project view.
-
In the root
build.gradle, declare the Nexconn Maven repository:Use the setup that matches your Gradle plugin version:
- Gradle plugin < 8.0
- Gradle plugin 8.0+
Open the root
build.gradlefile and add:Groovyallprojects {
repositories {
...
mavenCentral()
}
}Open
settings.gradlein the root directory and add:GroovydependencyResolutionManagement {
repositories {
...
mavenCentral()
}
} -
In your app-level
build.gradle, add the Nexconn SDK as a dependency. Replacex.y.zwith the latest version from the Maven repository.Groovydependencies {
...
implementation 'ai.nexconn.chat:chat:x.y.z'
}
Step 2: Initialize the SDK
Call NCEngine.initialize() in your Application's onCreate() method. Obtain your App Key from the Nexconn Console before proceeding.
This quickstart shows basic initialization. For full options including overseas data centers and private cloud configuration, see Initialize the SDK.
Singapore data center (default)
If your App Key belongs to the Singapore data center, you do not need extra configuration.
- Kotlin
- Java
val appKey = "Your_AppKey" // e.g., bos9p5rlcm2ba

NCEngine.initialize(InitParams(applicationContext, appKey))
String appKey = "Your_AppKey"; // e.g., bos9p5rlcm2ba

NCEngine.initialize(new InitParams(getApplicationContext(), appKey));
Global data center
If you use another data center, pass the corresponding AreaCode.
- Kotlin
- Java
val appKey = "Your_AppKey"

val initParams = InitParams(applicationContext, appKey).apply {
    areaCode = AreaCode.SG
}

NCEngine.initialize(initParams)
String appKey = "Your_AppKey";

InitParams initParams = new InitParams(getApplicationContext(), appKey);
initParams.setAreaCode(AreaCode.SG);

NCEngine.initialize(initParams);
Step 3: Listen for messages
Add a channel handler to receive real-time and offline messages.
Register the handler before connecting to ensure all offline messages are received.
- Kotlin
- Java
NCEngine.addMessageHandler("MyHandler", object : MessageHandler {
    override fun onMessageReceived(event: MessageReceivedEvent) {
        val message = event.message
        println("Received message: ${message.messageId}")

        when (message.content) {
            is TextMessage -> {
                val text = (message.content as TextMessage).text
                println("Text: $text")
            }
            is ImageMessage -> {
                println("Image message received")
            }
        }
    }
})
NCEngine.addMessageHandler("MyHandler", new MessageHandler() {
    @Override
    public void onMessageReceived(@NonNull MessageReceivedEvent event) {
        Message message = event.getMessage();
        System.out.println("Received message: " + message.getMessageId());

        MessageContent content = message.getContent();
        if (content instanceof TextMessage) {
            String text = ((TextMessage) content).getText();
            System.out.println("Text: " + text);
        } else if (content instanceof ImageMessage) {
            System.out.println("Image message received");
        }
    }
});
Step 4: Connect to the server
Get an access token
To simulate messaging, register a user first. Your app server calls the Nexconn Server API to register a user and obtain an access token. For this quickstart, use a token for user ID 1 returned by your app server:
HTTP/1.1 200 OK
Content-Type: application/json; charset=utf-8

{
  "code": 200,
  "userId": "1",
  "token": "gxld6GHx3t1eDxof1qtxxYrQcjkbhl1V@sgyu.cn.example.com;sgyu.cn.example.com"
}
Add a connection handler
Set up a connection handler to monitor connection status. Use it to update the UI, such as showing "Reconnecting..." or "Connected." Register the handler for your app's lifecycle and remove it when you no longer need it.
- Kotlin
- Java
NCEngine.addConnectionStatusHandler("ConnectionHandler") { event ->
    when (event.status) {
        ConnectionStatus.CONNECTED -> println("Connected")
        ConnectionStatus.UNCONNECTED -> println("Disconnected")
        ConnectionStatus.TOKEN_INCORRECT -> println("Token error")
        else -> println("Status: ${event.status}")
    }
}
NCEngine.addConnectionStatusHandler("ConnectionHandler", event -> {
    if (event.getStatus() == ConnectionStatus.CONNECTED) {
        System.out.println("Connected");
    } else if (event.getStatus() == ConnectionStatus.UNCONNECTED) {
        System.out.println("Disconnected");
    } else if (event.getStatus() == ConnectionStatus.TOKEN_INCORRECT) {
        System.out.println("Token error");
    } else {
        System.out.println("Status: " + event.getStatus());
    }
});
Connect
Call NCEngine.connect() with the access token to establish a connection.
The Nexconn SDK has a built-in reconnection mechanism. Call connect() only once per app lifecycle. For details, see Connection.
- Kotlin
- Java
val token = "gxld6GHx3t1eDxof1qtxxYrQcjkbhl1V@sgyu.cn.example.com;sgyu.cn.example.com"

NCEngine.connect(ConnectParams(token)) { userId, error ->
    if (error == null && userId != null) {
        println("Connected as user: $userId")
    } else {
        println("Connection failed: ${error?.message}")
    }
}
String token = "gxld6GHx3t1eDxof1qtxxYrQcjkbhl1V@sgyu.cn.example.com;sgyu.cn.example.com";

NCEngine.connect(new ConnectParams(token), new ConnectHandler() {
    @Override
    public void onResult(String userId, NCError error) {
        if (error == null && userId != null) {
            System.out.println("Connected as user: " + userId);
        } else {
            System.out.println("Connection failed: " + (error != null ? error.getMessage() : ""));
        }
    }

    @Override
    public void onDatabaseOpened(boolean isRecreated, NCError error) {
        if (error != null) {
            System.out.println("Database open failed: " + error.getMessage());
        }
    }
});
Step 5: Send a message
Send a text message to user ID 2 through a direct channel. The SDK also supports image, file, voice, and other message types. See Message types for details.
- Kotlin
- Java
val channel = DirectChannel("2")

val textMessage = TextMessage("Hello from user 1!")

val params = SendMessageParams(textMessage).apply {
    pushConfig = PushConfig().apply {
        pushContent = "You have a new message"
    }
}

channel.sendMessage(params, object : SendMessageHandler {
    override fun onAttached(message: Message) {
        println("Message saved to local DB: ${message.messageId}")
    }

    override fun onResult(message: Message?, error: NCError?) {
        if (error == null) {
            println("Message sent: ${message?.messageId}")
        } else {
            println("Send failed: ${error.message}")
        }
    }
})
DirectChannel channel = new DirectChannel("2");

TextMessage textMessage = new TextMessage("Hello from user 1!");

SendMessageParams params = new SendMessageParams(textMessage);
PushConfig pushConfig = new PushConfig();
pushConfig.setPushContent("You have a new message");
params.setPushConfig(pushConfig);

channel.sendMessage(params, new SendMessageHandler() {
    @Override
    public void onAttached(@NonNull Message message) {
        System.out.println("Message saved to local DB: " + message.getMessageId());
    }

    @Override
    public void onResult(@Nullable Message message, @Nullable NCError error) {
        if (error == null) {
            System.out.println("Message sent: " + (message != null ? message.getMessageId() : ""));
        } else {
            System.out.println("Send failed: " + error.getMessage());
        }
    }
});
What's next
- Message types — Send image, voice, file, and custom messages
- Channel management — Retrieve and manage channels
- Group channels — Create and manage group channels
- API reference — Full API documentation